Notes : Kubernetes
Section 16: Kubernetes Production Deployment
The Deployment Process
Production will follow the following workflow
- Create Github Repo
- Tie repo to Travis CI
- Create google cloud project
- Enable billing for the project
- Add deployment scripts to the repo
Google Cloud vs AWS for Kubernetes
- Google created Kubernetes
- AWS only “recently” got Kubernetes support
- Far, far easier to poke around Kubernetes on Google Cloud
- Excellent documentation for beginners
Create a Repository, take a Reference and link it to Travis.
Create a Google Cloud Project
Visit console.cloud.google.com (Google Cloud Console). Click Create Project and name is multi-k8s. After Project is created select the active project.
We will need to enable billing from Nav Menu on top left burger button.
-
Click the Hamburger menu on the top left-hand side of the dashboard.
-
Click Kubernetes Engine
-
Click the ENABLE button to enable the Kubernetes API for this project.
-
After a few minutes of waiting, clicking the bell icon in the top right part of the menu should show a green checkmark for Enable services: container.googleapis.com
-
If you refresh the page it should show a screen to create your first cluster. If not, click the hamburger menu and select Kubernetes Engine and then Clusters. Once you see the screen below, click the CREATE button.
-
A Create Cluster dialog will open and provide two choices. Standard and Autopilot. Click the CONFIGURE button within the Standard cluster option
-
A form similar to the one shown in the video will be presented. Set the Name to multi-cluster (step 1). Confirm that the Zone set is actually near your location (step 2). The Node Pool that is discussed in the video is now found in a separate dropdown on the left sidebar. Click the downward-facing arrow to view the settings. No changes are needed here (step 3). Finally, click the CREATE button at the bottom of the form (step 4).

-
After a few minutes, the cluster dashboard should load and your multi-cluster should have a green checkmark in the table.
Don’t Forge to Cleanup !
Remember, as long as this cluster is running you will be billed real life money!
Steps to clean up:
-
Click the project selector on the top left of the page
-
Click the 'gear' icon on the top right
-
Find your project in the list of projects that is presented, then click the three dots on the far right hand side
4) Click 'Delete'
Travis Deployment Overview
Google Cloud SDK CLI allows login to Docker CLI and manipulate directly the kubernetes cluster.
- Install Google Cloud SDK CLI
- Configure the SDK with out Google Cloud Auth Info
- Login to Docker CLI
- Build “test” version of multi-client
- Run tests
- If test are successful, run a script to deploy newest images
- Build all our images, tag each one, push each to docker
- Apply all configs in the “k8s” folder
- Imperatively set latest images on each deployment
Create a .travis.yaml file
sudo: required
services:
  - docker
before_install:
    # openssl command after encrytion from travis cmd line
    # openssl aes-256-cbc -K ...
    # install google-cloud sdk
  - curl https://sdk.cloud.google.com | bash > dev/null;
  - source $HOME/google-cloud-sdk/path.bash.inc
  # install minikube
  - gcloud components update kubectl
  # authenticate
  - gcloud auth activate-service-account --key-file service-account.json
Creating a Service Account
- Click the Hamburger menu on the top left-hand side of the dashboard, find IAM & Admin, and select Service Accounts. Then click the CREATE SERVICE ACCOUNT button.
- In the form that is displayed, set the Service account name to travis-deployer (step 1), then click the CREATE button (step 2).
- Click in the Select a role filter and scroll down to select Kubernetes Engine and then Kubernetes Engine Admin.
- Make sure the filter now shows Kubernetes Engine Admin and then click CONTINUE
- The Grant users access form is optional and should be skipped. Click the DONE button.
- You should now see a table listing all of the service accounts including the one that was just created. Click the three dots to the right of the service account you just created. Then select Manage Keys in the dropdown.
- In the Keys dashboard, click ADD KEY and then select Create new key.
- In the Create private key dialog box, make sure Key type is set to JSON, and then click the CREATE button.
- The JSON key file should now download to your computer.
Now we should install Travis CLI to encrypt and upload the json file to our Travis account. In travis.yml add code to unencrypted the json file and load into GCloud SDK.
Running Travis CLI in a Container
Travis CLI need Ruby !! Pain to be setup on windows :). well you could use a container to install ruby. Lets get a Docker image that has pre-installed, then we can install CLI in there.
Remember now we have to use github tokens to login.
docker run -t v $(pwd):/app ruby:2.4
gem install travis
# we can use --com or --pro
travis login --github-token YOUR_TOKEN --com
# copy json file into the 'volumed' diectory so we can use it in the container
travis encrypt-file service-account.json -r USERNAME/REPO --com
Remove the service-account.json before uploading to the repository !!! Keep the service-account.json.enc file and upload it to the repo.
More on Google Cloud CLI config
sudo: required
services:
  - docker
env:
    global:
      # git sha for tagging images, for more see section below
      - SHA=$(git rev-parse HEAD)
      # no input prompt
      - CLOUDSDK_CORE_DISABLE_PROMPTS=1
before_install:
    # openssl command after encrytion from travis cmd line
    # openssl aes-256-cbc -K ...
    # install google-cloud sdk
  - curl https://sdk.cloud.google.com | bash > dev/null;
  - source $HOME/google-cloud-sdk/path.bash.inc
  # install minikube
  - gcloud components update kubectl
  # authenticate
  - gcloud auth activate-service-account --key-file service-account.json
  - gcloud config set project skilful-ber-214822
  - gcloud config set compute/zon us-central1-a
  - gcloud container clusters get-credentials multi-cluster
  - echo "$DOCKER_PASSWORD" | docker login -u "$DOCKER_USERNAME" --password-stdin
  - docker build -t stephengrider/react-test -f ./client/Dockerfile.dev ./client
script:
  - docker run -e CI=true USERNAME/react-test npm test
# ... (1)
Custom Deployment Providers
Continuing on the Travis file
script:
  - docker run -e CI=true USERNAME/react-test npm test
# ... (1)
deploy:
  provider: script
  # we use this custom deploy file
  script: bash ./deploy.sh
  on:
    branch: master
Create a new bash file deploy.sh.
#!/bin/bash
# Building images
docker build -t stephengrider/multi-client:latest -t multi-client:$SHA -f ./client/Dockerfile ./client
docker build -t stephengrider/multi-server:latest -t multi-server:$SHA -f ./server/Dockerfile ./server
docker build -t stephengrider/multi-worker:latest -t multi-worker:$SHA -f ./worker/Dockerfile ./worker
# Pushing images to Dockerhub
docker push stephengrider/multi-client:latest
docker push stephengrider/multi-server:latest
docker push stephengrider/multi-worker:latest
docker push stephengrider/multi-client:$SHA
docker push stephengrider/multi-server:$SHA
docker push stephengrider/multi-worker:$SHA
# Take all k8s config
kubectl apply -f k8s
kubectl set image deployments/server-deployment server=stephengrider/multi-server:$SHA
kubectl set image deployments/client-deployment client=stephengrider/multi-client:$SHA
kubectl set image deployments/worker-deployment worker=stephengrider/multi-worker:$SHA
Unique Tags for Built Images
We have a git repository and with every commit a hash SHA is generated, we could use it as a tag along with latest tag.
Tagging images with git sha is good practice because at any point in time we know exactly what code is running in the clusters.
We are still tagging images with latest because it saves the trouble of finding the latest image among many sha for new engineers.
Configuring the GCloud CLI on Cloud
We had created a secret for kubernetes Secrets Objects earlier. Find the Active Cloud Shell and click it.
Execute Following to select correct project and zone.
# Select the correct project
gcloud config set project skilful-berm-214822
# Set the zone
gcloud config set compute/zone us-central1-a
# Get Credentials
gcloud container clusters get-credentials
Create a Secret
kubectl create secret generic pgpassword --from-literal PGPASSWORD=mypgpassword123
Helm Setup
Google Cloud doesn’t yet know what Ingress-Nginx is ! So we gonna install it with the help of Helm. Note we could easily have gone : mandatory and provider specific commands but we gonna need helm later on.
Helm is used to administer third party software inside Kubernetes. Helm and Tiller go hand in hand.
Installing Helm, run following command in Google Cloud Console run
curl -fsSL -o get_helm.sh https://raw.githubusercontent.com/helm/helm/master/scripts/get-helm-3
chmod 700 get_helm.sh
./get_helm.sh
Kubernetes Security with RBAC
Google GKE hosted Kubernetes platform enables RBAC by default. You will need to create Tiller Server.
Helm Client relays our commands to Tiller Server and its Tiller Server which will change Kubernetes Cluster.
RBAC : Role Based Access Control : limit who can access and modify object in our cluster. Enable by default. Tiller wants to make changes to our cluster, so it requires permissions to make changes.
- User Accounts : Identifies a person administering the cluster
- Service Accounts: Identifies a pod administering a cluster
- ClusterRoleBinding: Authorizes an account to do a certain set of actions across the entire cluster
- RoleBinding : Authorizes an account to do a certain set of actions in a single namespace
We will create a Service Account for Tiller and then allow ClusterRoleBinding to it.
bash
 # service account creation
 kubectl create serviceaccount --namespace kube-system tiller
 # binding
 kubectl create clusterrolebinding tiller-cluster-rule --clusterrole=cluster-admin --serviceaccount=kube-system:tiller
Installing Ingress-Nginx
helm repo add ingress-nginx https://kubernetes.github.io/ingress-nginx
helm install my-release ingress-nginx/ingress-nginx
Updating Cluster Version (only if you are prompted to)
gcloud container clusters upgrade YOUR_CLUSTER_NAME --master --cluster-version 1.16
Switch to workloads tab and notice the Names of workloads
A default backend no longer ships with ingress-nginx, so, if you only see a controller and you get a 404 Not Found when visiting the IP address, this is perfectly expected.
Finally Deployment
Commit everything and we expect CI to build images and update Kubenetes cluster.
Remeber Travis CI runs Build test for all branches but only pushes the code if its commited to main branch. So recommended workflow is to have a branch write some code, and if its built correctly merge it to main branch.
Section 17: HTTPS Setup with Kubernetes
HTTPS Setup Overview
Setting up HTTPS require 10$ for domain name.
LetsEncrypt is a free service that allows us to get free certificates.
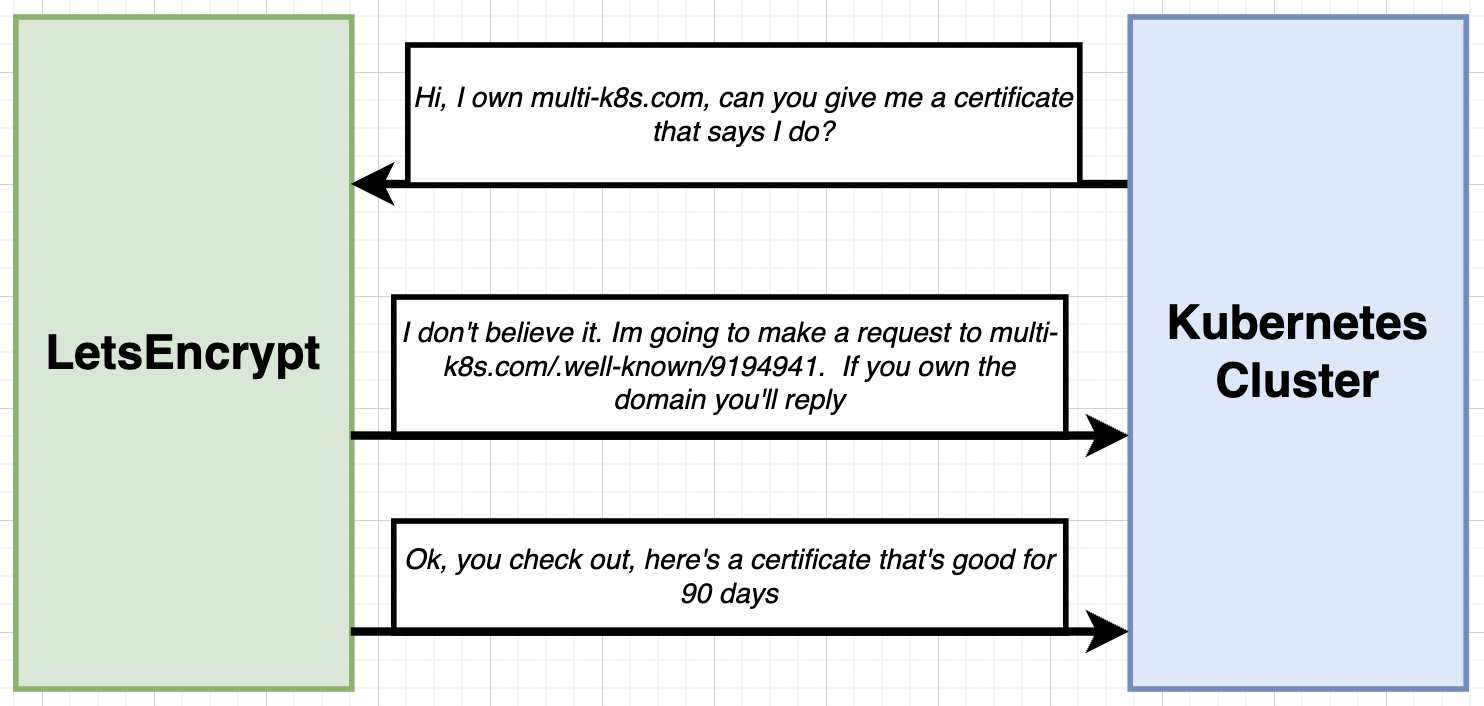
Its really hard to craft response for LetsEncrypt to verify ourselves.
We gonna use Cert Manager Plugin provided in Helm.
Buy the Domain.
Set the A record with following entry for the ip
Name : @ ,Type : A ,TTL:5min, IP: 30.14.13.54
Name : www ,Type : CNAME ,TTL:5min, IP: k8s-multi.com.
Installing Cert Manager
-
Create the namespace for cert-manager:
kubectl create namespace cert-manager -
Add the Jetstack Helm repository
helm repo add jetstack https://charts.jetstack.io -
Update your local Helm chart repository cache:
helm repo update -
bash # install the cert-manager helm chart helm instsall cert-manager jestack/cert-manager --namespce cert-manager --version v1.2.0 --create-namespace -
bash
   # install the CRDs
   kubectl apply -f https://github.com/jetstack/certmanager/releases/download/v1.2.0/cert-manager.crds.yaml
Official Installation Documentation
Setting up Cert Manager
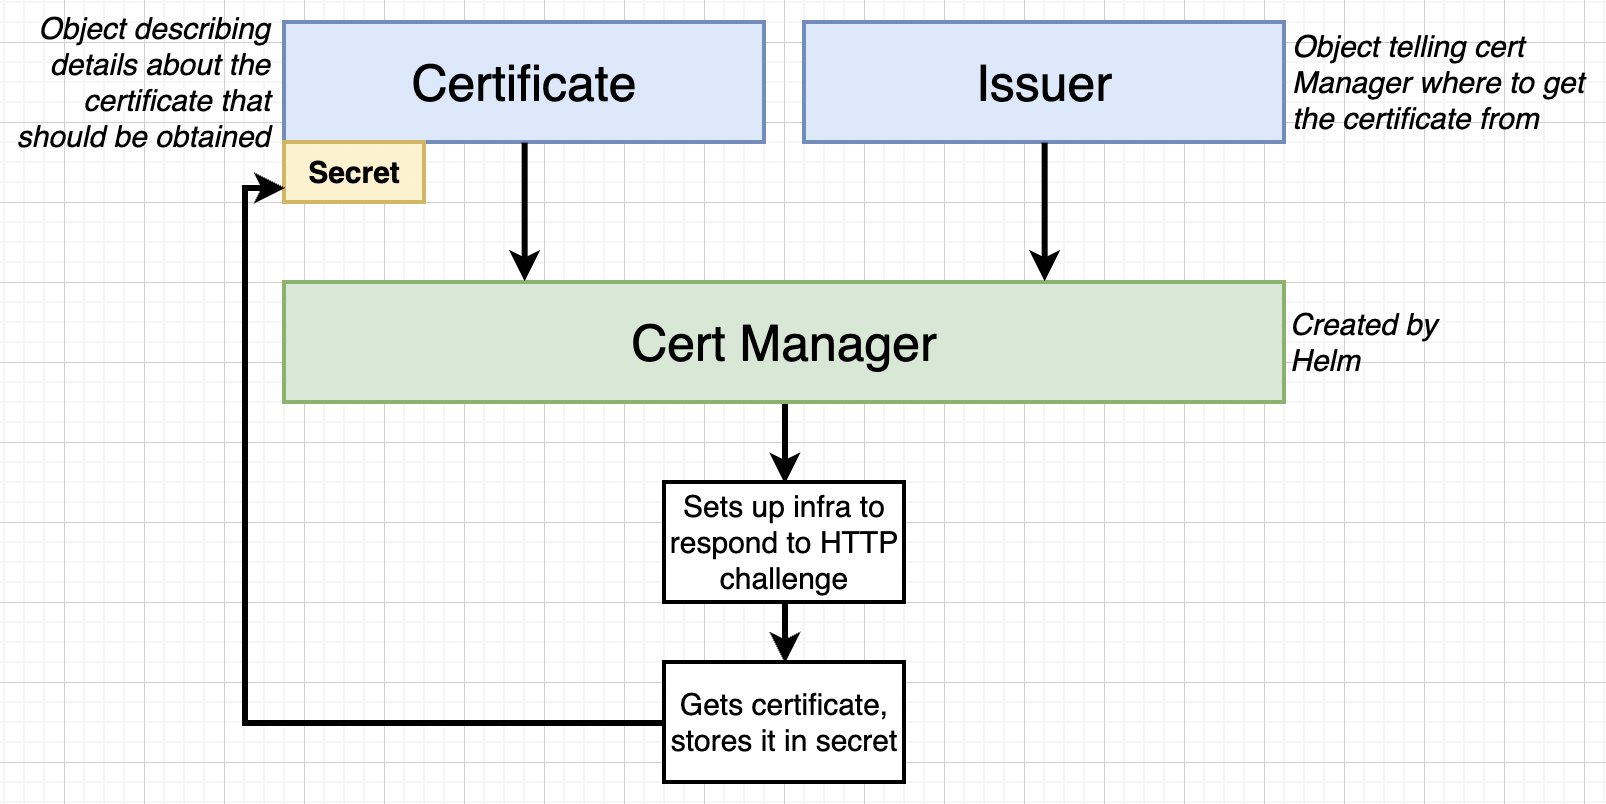
We are going to use Objects in our Kubernetes project to store certificate and reply to lets encrypt.
Also LetsEncrypt allows a practice server for allowing responses using multi-issuers. Lets avoid them for now.
Create a file issuer.yaml in k8s directory
apiVersion: cert-manager.io/v1
kind: ClusterIssuer
metadata:
  name: letsencrypt-prod
spec:
  acme:
    server: https://acme-v02.api.letsencrypt.org/directory
    email: "[email protected]"
    privateKeySecretRef:
      name: letsencrypt-prod
    solvers:
      - http01:
          ingress:
            class: nginx
Certificate Manifest Official Docs
Create a certificate.yaml file in k8s directory.
apiVersion: cert-manager.io/v1

kind: Certificate
metadata:
  name: yourdomain-com-tls
spec:
  secretName: yourdomain-com
  issuerRef:
    name: letsencrypt-prod
    kind: ClusterIssuer
  commonName: yourdomain.com
  dnsNames:
    - yourdomain.com
    - www.yourdomain.com
We also need to Change to Ingress after we have got certificate and then enable it the Cert-Manager to use new certificate.
If you have deployed your issuer and certificate manifests to GCP and you are getting No Resources Found when running kubectl get certificates, then continue on to the next step to create and deploy the Ingress manifest. Deploying the updated Ingress should trigger the certificate to be issued.
Updating Ingress Config for HTTPS
Add following to annotations and to specs
annotations:
  cert-manager.io/cluster-issuer: 'letsencrypt-prod'
  # HTTP -> HTTPS
  nginx.ingress.kubernetes.io/ssl-redirect: 'true'
spec:
  tls:
    - hosts:
      - youdomain.com
      - www.yourdomain.com
      # name of the secret that used to store certs
      secretName: yourdomain-com
  rules:
    - host: yourdomain.com
      http:
        paths:
          - path: /
            backend:
              serviceName: client-cluster-ip-service
              servicePort: 3000
          - path: /api/
            backend:
              serviceName: server-cluster-ip-service
              servicePort: 5000
    - host: www.yourdomain.com
      http:
        paths:
          - path: /
            backend:
              serviceName: client-cluster-ip-service
              servicePort: 3000
          - path: /api/
            backend:
              serviceName: server-cluster-ip-service
              servicePort: 5000
Google Cloud Cleanup
Cleaning Up Local Setup
To remove everything we deployed from k8s directory
kubectl delte -f k8s/
To remove ingress-nginx
kubectl delete -f https://raw.githubusercontent.com/kubernetes/ingress-nginx/controller-v1.1.2/deploy/static/provider/cloud/deploy.yaml
To stop minikube and remove it
minikube stop
minikube delete
Stopping Running Containers
docker ps
docker stop <container_id>
# to clear cache
docker system prune
Section 18: Local Development with Scaffold
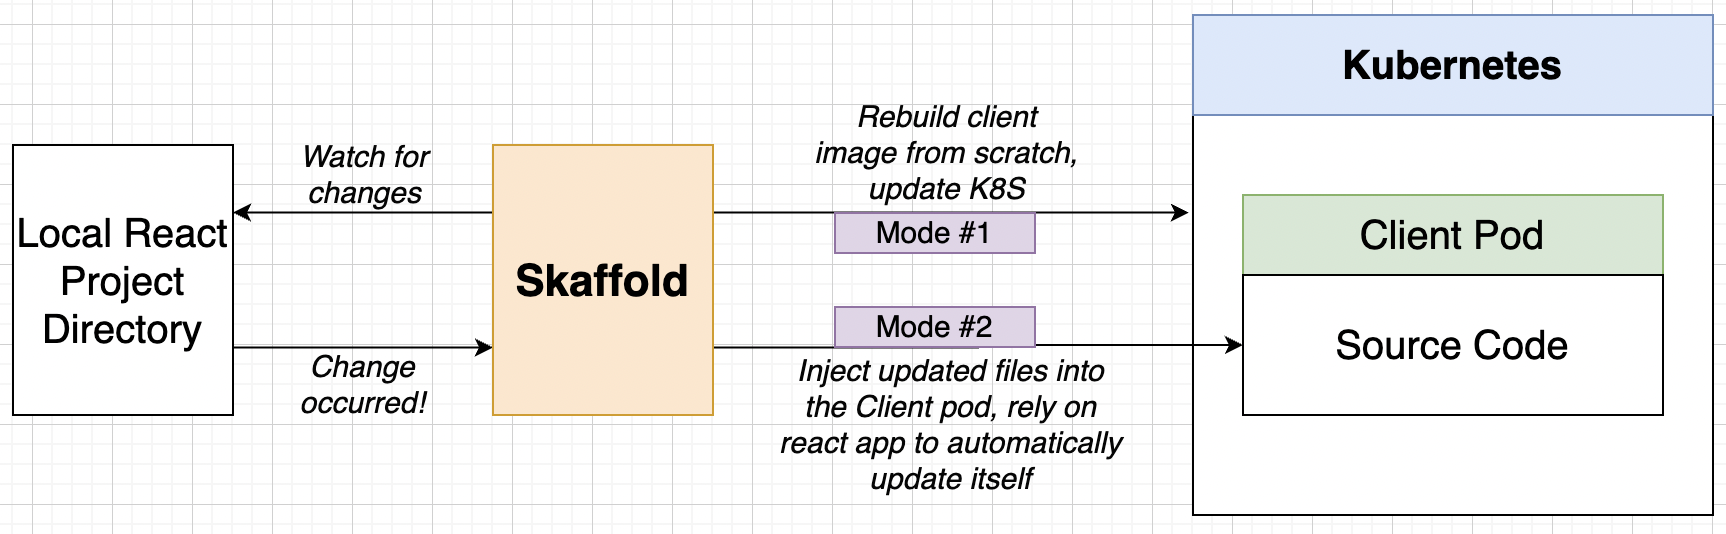
Awkward Local Setup
We currently don’t have ability to see live changes while local development. We did find a trick for docker containers but what about Kubernetes. There are 2 modes of operation of Scaffold.
Scafflod Config File
We will create in root file directory a file called skaffold.yaml that will tell how the scaffold should act.
apiVersion: skaffold/v2beta12
kind: Config
deploy:
  kubectl:
    manifests:
      - ./k8s/*
build:
# disable by default push behaviour to dockerhub on building images.
  local:
    push: false
  artifacts:
    - image: cygnetops/client-skaffold
      context: client
      docker:
        dockerfile: Dockerfile.dev
      sync:
        manual:
          - src: "src/**/*.js"
            dest: .
          - src: "src/**/*.css"
            dest: .
          - src: "src/**/*.html"
            dest: .
    - image: cygnetops/worker-skaffold
      context: worker
      docker:
        dockerfile: Dockerfile.dev
      sync:
        manual:
          - src: "*.js"
            dest: .
    - image: cygnetops/server-skaffold
      context: server
      docker:
        dockerfile: Dockerfile.dev
      sync:
        manual:
          - src: "*.js"
            dest: .
Update your client/Dockerfile.dev to add CI=true
FROM node:alpine
ENV CI=true

WORKDIR "/app"
COPY ./package.json ./
RUN npm install
COPY . .
CMD ["npm","run","start"]
Finally run skaffold dev in your terminal (may take several minutes to run)
Automatic Shutdown
If we ctrl + c then skaffold automatically stops the objects. Do not add persistent config files to build of deploy cause skaffold will certainly delete it.